Build an Admin Template w/ Semantic UI React - Part 1: Intro/Setup
In this tutorial, we will introduce our admin template/dashboard project and setup Semantic UI React with Create React App. This is part 1 of a series of tutorials where we walk you through building an admin template/dashboard using Semantic UI React, React Router 5 and React Redux.

If you would like to learn how to build a back end for this project, check out our series on creating a REST API with PostgreSQL and KnexJS
More from this series
- Intro/Setup
- Login/Signup
Project Introduction
A password protected members only area is an essential part of any web application or website. Without one, you couldn't show your users their recent purchases, allow them to have their own funky profile or have any users only features for that matter. Before we begin you will need to know what your trying to build and do some initial setup.
What are we building
Our goal with this series is to create a beautiful and responsive React admin template all while getting familiar with Semantic UI React. Have a look at the finished project that you will end up with:

As this tutorial series grows over time, we will update this little gif to showcase new features being added.
What is Semantic UI React
-
Semantic UI is a development framework for the web intended to help developers create beautiful and responsive layouts easily with its extensive library of ready made components. It is developed and maintaned by Jack Lukic
-
Semantic UI React is the official Implementation of the Semantic UI framework in React and is developed and maintained by Levi Thomason and a community of developers.
Project Setup
Okay let's get to the good stuff.
1. Install semantic-ui-react
First you are going to need to use create-react-app to create a new react project and then install semantic-ui-react in that project:
npm install semantic-ui-react
# yarn add semantic-ui-react
2. LESS support with CRACO
Next install CRACO and semantic-ui-less:
npm install @craco/craco @semantic-ui-react/craco-less semantic-ui-less --save-dev
# yarn add @craco/craco craco-less semantic-ui-less --dev
CRACO is an NPM package that stands for "Create React App Configuration Override" which allows you to configure creact-react-app without ejecting. More specifically it allows you to use LESS with create-react-app which is required by Semantic-UI React for it's styling.
3. Setup CRACO
Now change your package.json scripts so that craco will be used when running your project instead of the default scripts that come with create-react-app:
"scripts": {
    "start": "craco start",
    "build": "craco build",
    "test": "craco test",
    "eject": "craco eject"
  }
Create a craco.config.js file in your projects root (alongside package.json):
module.exports = {
  plugins: [{ plugin: require("@semantic-ui-react/craco-less") }],
};
4. Bootstrap CLI tool
The Semantic UI React people have created a handy tool to automatically copy the initial file structure for Semantic to work. Run the following command and you'll end up with a src/semantic-ui folder with everything your going to need:
npx @semantic-ui-react/bootstrap5. Theme config
Edit the src/semantic-ui/theme.config file created in the previous step to look like this:
/* To override a theme for an individual element
   specify theme name below
*/

/* Global */
@site        : 'default';
@reset       : 'default';

/* Elements */
@button      : 'default';
@container   : 'default';
@divider     : 'default';
@flag        : 'default';
@header      : 'default';
@icon        : 'default';
@image       : 'default';
@input       : 'default';
@label       : 'default';
@list        : 'default';
@loader      : 'default';
@placeholder : 'default';
@rail        : 'default';
@reveal      : 'default';
@segment     : 'default';
@step        : 'default';

/* Collections */
@breadcrumb  : 'default';
@form        : 'default';
@grid        : 'default';
@menu        : 'default';
@message     : 'default';
@table       : 'default';

/* Modules */
@accordion   : 'default';
@checkbox    : 'default';
@dimmer      : 'default';
@dropdown    : 'default';
@embed       : 'default';
@modal       : 'default';
@nag         : 'default';
@popup       : 'default';
@progress    : 'default';
@rating      : 'default';
@search      : 'default';
@shape       : 'default';
@sidebar     : 'default';
@sticky      : 'default';
@tab         : 'default';
@transition  : 'default';

/* Views */
@ad          : 'default';
@card        : 'default';
@comment     : 'default';
@feed        : 'default';
@item        : 'default';
@statistic   : 'default';

/*******************************
            Folders
*******************************/

@themesFolder : 'themes';
@siteFolder  : '../../src/semantic-ui/site';


/*******************************
         Import Theme
*******************************/

@import (multiple) "~semantic-ui-less/theme.less";
@fontPath : '../../../themes/@{theme}/assets/fonts';

/* End Config */
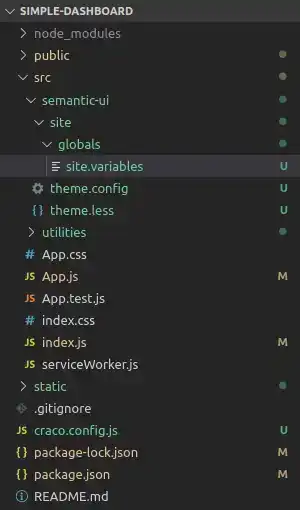
Now add the following to src/semantic-ui/site/globals/site.variables:
@primaryColor: #002f4e;
@pageBackground: #eff0f1;
Your directory structure should look like this:
6. Add it to your entry script
At the top of index.js, add an import for semantic-ui-less like so:
import "semantic-ui-less/semantic.less";7. Try it out
Now in the terminal type the following which will run Create React App using CRACO:
npm startAnd that's it!
Conclusion
Believe it or not, Semantic UI is ready to go. You can begin building your admin template (or any template you'd like for that matter). In part 2 we will create the Login/Sign up pages using Semantic UI React and React Router.

Tools
Crypto Alerts
© Cloud Giant 2024. All rights reserved

