

Create a REST API [Part 5]: Verify Users with Tokens
In this tutorial, you will create a new API route that is passed a verification token used to confirm a user registration through your API by updating an entry in your PostgreSQL database. This is part 5 of a series of tutorials on building a REST API in Node with ExpressJS, KnexJS, and PostgreSQL.

![Create a REST API [Part 5]: Verify Users with Tokens](/static/81ade7b7964da5e51b46f26aca71b3f3/aeda5/create-a-rest-api-postgresql-with-knex-setup.webp)
More from this series
- Project Setup with Express
- PostgreSQL with KnexJS Setup
- User Registration and Validation
- Send Emails with Amazon SES
- Verify Users with Tokens
- User Login with JWT Authentication
- Forgot / Reset Password Routes
Introduction
Now that you can send out emails with verification tokens, you'll need a way to accept that token and verify that a user has access to the email address they registered with on your website. Let's do that.
Step 1 - Create a verification route
In your users.js file, add another route that will take in the token that is sent when a user registers through your API. Under your '/register' route and a new post route for '/verify/:token' that will grab the token from the request parameters:
router.post("/verify/:token", (req, res) => {
  const { token } = req.params;
  const errors = {};
Add a database query that checks if the token exists and has not been used before. In which case, return an "Email verifed!" message and update the 'emailverifed' and 'tokenusedbefore' fields to true:
  database
    .returning(["email", "emailverified", "tokenusedbefore"])
    .from("users")
    .where({ token: token, tokenusedbefore: "f" })
    .update({ emailverified: "t", tokenusedbefore: "t" })
    .then(data => {
      if (data.length > 0) {
        res.json(
          "Email verified! Please login to access your account"
        );
      }
If the above query comes back empty, check the database again to see if the token exists and if 'emailverified' is true. In which case send a message stating 'Email already verified':
      else {
        database
          .select("email", "emailverified", "tokenusedbefore")
          .from("users")
          .where("token", token)
          .then(check => {
            if (check.length > 0) {
              if (check[0].emailverified) {
                errors.alreadyVerified =
                  "Email already verified. Please login to your account.";
                res.status(400).json(errors);
              }
If token is absent there could be two possibilities, the user did not register or the token has expired:
          } else {
              errors.email_invalid =
                "Email invalid. Please check if you have registered with the
                correct email address or re-send the verification link to your
                  email.";
              res.status(400).json(errors);
            }
          })
          .catch(err => {
            errors.db = "Bad request";
            res.status(400).json(errors);
          });
      }
    })
    .catch(err => {
      errors.db = "Bad request";
      res.status(400).json(errors);
    });
});
Get the complete code for users.js here
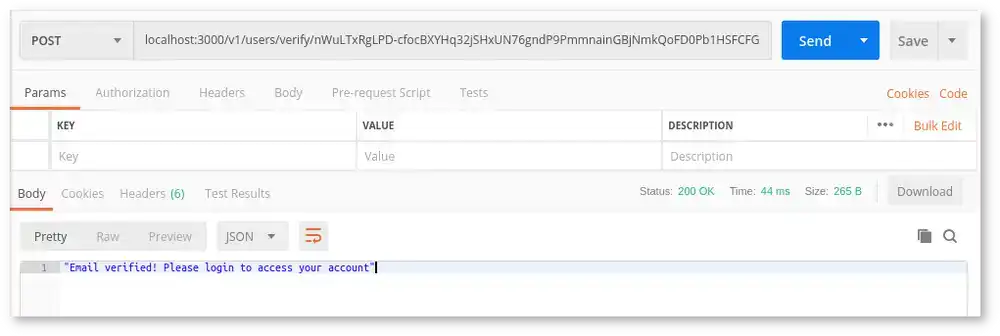
Step 2 - See it in action
With your server running, take the token that you received by email in part 4 of this series (everything after 'htts://yourwebsite/v1/users/verify/')

and add a new post request in Postman to your '/verify/:token' route. If everything is working you should get the following message back from your API:
Hint! Enter in the wrong token and see what message you get back in Postman
Step 3 - Add a token expiry time
Creating tokens that never expire and sending them out over the internet is not very good for security. Let's create a tokenExpiry.js file in the utilities folder to fix this:
// simple-api/utilities/tokenExpiry.js

const database = require("../database");

// Function runs every 4 seconds
setInterval(async function checkRegistrationTokenValidity() {
  await database
    .select("id", "createdtime")
    .from("users")
    .then((timeOfTokenCreation) => {
      timeOfTokenCreation.map((entryTime) => {
        // Convert UTC time to an integer to compare with current time
        let timeInInt = parseInt(entryTime.createdtime);

        // Check if an hour has passed since the token was generated
        if (Date.now() > timeInInt + 60000 * 60) {
          database
            .table("users")
            .where("id", entryTime.id)
            .update({ token: null }) //updates old tokens to null
            .then((res) => res)
            .catch((err) => err);
        }
      });
    })
    .catch((err) => console.log(err));
}, 4000);
tokenExpiry.js contains a function that runs every 4 seconds and checks the following:
- If an hour has passed after a user has registered through the API.
- If so, the token issued to the user at the time of registration is deleted from the database.
Include tokenExpiry.js in your server.js file so that it will run on startup:
const tokenExpiry = require("./utilities/tokenExpiry");Step 6 - Create a resend email route
Now that tokens expire after an hour, what happens if a user hasn't verified on time but they still want to use your website? Create a new route called 'resend_email' that your users can use to request a fresh token to verify with. But first add a new validation function to check email addresses on this new route. In your validation directory, create a new file called resend.js:
//simple-api/validation/resend.js

const Validator = require("validator");
const ifEmpty = require("./checkForEmpty");

module.exports = function checkResendField(data) {
  let errors = {};

  data.email = !ifEmpty(data.email) ? data.email : "";

  if (Validator.isEmpty(data.email)) {
    errors.email = "Email is required";
  }
  if (!Validator.isEmail(data.email)) {
    errors.email = "Email address is invalid";
  }

  return {
    errors,
    isValid: ifEmpty(errors),
  };
};
Now import the function at the top of users.js:
// simple-api/api/routes/users.js

const express = require("express");
const router = express.Router();
const bcrypt = require("bcryptjs");
const crypto = require("crypto");
const database = require("../../database");
// Send email utility
const sendEmail = require("../../utilities/sendEmail");
// Validation
const checkRegistrationFields = require("../../validation/register");
// Resend email validaiton
const checkResendField = require("../../validation/resend");
Add a 'resend_email' route under the '/verify' route with crypto.randomBytes again to generate a fresh token:
router.post("/resend_email", (req, res) => {

  const { errors, isValid } = checkResendField(req.body);

  if (!isValid) {
    return res.status(400).json(errors);
  }

  let resendToken;
  crypto.randomBytes(48, (err, buf) => {
    if (err) throw err;
    resendToken = buf
      .toString("base64")
      .replace(/\//g, "")
      .replace(/\+/g, "-");
    return resendToken;
  });
add two database calls within the '/resend_email/ route:
database
.table("users")
.select("*")
.where({ email: req.body.email })
.then(data => {
if (data.length == 0) {
errors.invalid = "Invalid email address. Please register again!";
res.status(400).json(errors);
} else {
database
.table("users")
.returning(["email", "token"])
.where({ email: data[0].email, emailverified: "false" })
.update({ token: resendToken, createdtime: Date.now() })
.then(result => {
if (result.length) {
let to = [result[0].email];
let link =
"https://yourWebsite/v1/users/verify/" + result[0].token;
let sub = "Confirm Registration";
let content =
"<body><p>Please verify your email.</p> <a href=" +
link +
">Verify email</a></body>";
sendEmail.Email(to, sub, content);
res.json("Email re-sent!");
} else {
errors.alreadyVerified =
"Email address has already been verified, please login.";
res.status(400).json(errors);
}
})
.catch(err => {
errors.db = "Bad request";
res.status(400).json(errors);
});
}
})
.catch(err => {
errors.db = "Bad request";
res.status(400).json(errors);
});
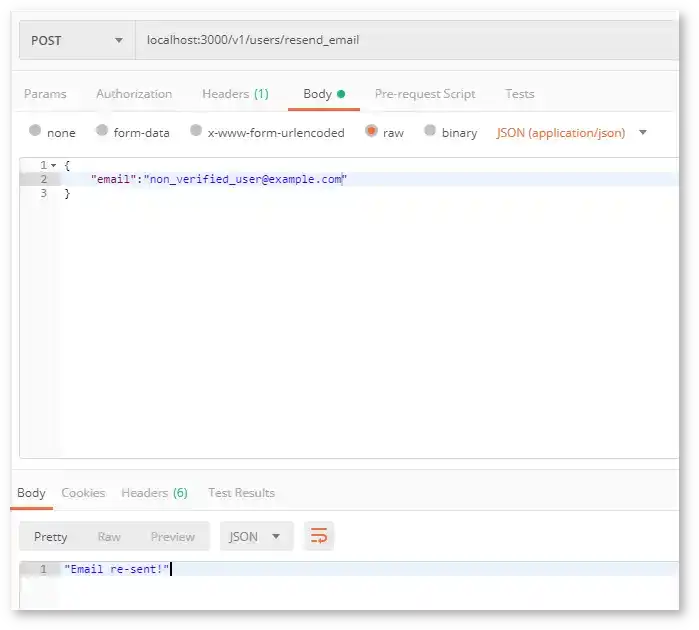
});Using the email passed to the resend_route, check if the email exists and if email has not been verified. Send the token if so.
If the email address has been registered in the database but is not yet verified, an 'Email re-sent!' message is returned (and a new token is sent):
Conclusion
If you have been following along with this series since the beginning, your registration flow should now resemble the chart below:
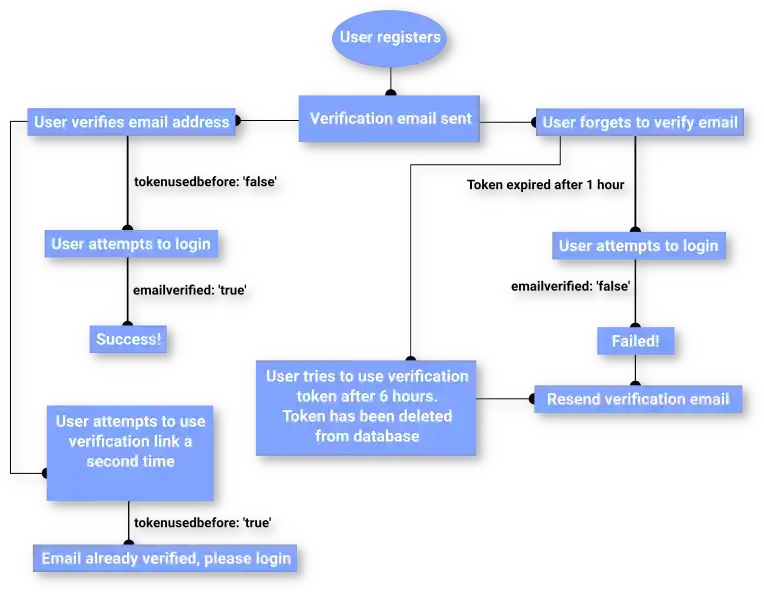
You now have an API which handles:
- User registration
- Sending verification emails
- Verifying tokens and confirming registration
- Allowing users to resend tokens when they forget them
There is a lot going on there. Let us know on social media how you are using this API in your projects!
Move on to part 6 of this series where we will create a user login route with JSON Web Token authentication.
Tools
Crypto Alerts
© Cloud Giant 2024. All rights reserved