

Create a REST API [Part 7]: Forgot / Reset Password Routes
In this tutorial, you will create API routes that will allow users to reset a lost password in your PostgreSQL database using KnexJS to make the connection. This is part 7 of a series of tutorials on building a REST API in Node with ExpressJS, KnexJS, and PostgreSQL.

![Create a REST API [Part 7]: Forgot / Reset Password Routes](/static/81ade7b7964da5e51b46f26aca71b3f3/aeda5/create-a-rest-api-postgresql-with-knex-setup.webp)
More from this series
- Project Setup with Express
- PostgreSQL with KnexJS Setup
- User Registration and Validation
- Send Emails with Amazon SES
- Verify Users with Tokens
- User Login with JWT Authentication
- Forgot / Reset Password Routes
Introduction
The routes explained below go hand in hand. The forgot password route allows your users to request a secure token be sent to their email. And the reset password route allows your users to pass that token back to verify that they are the account holder and to change their password.
Let's first modify your database so you can store these tokens (really just random strings) and some information about them.
Step 1 - Database Setup
You are going to need 3 new columns in the users table. You could delete and rebuild everything from scratch or you could alter your existing database and add the columns to it. Rebuilding the database is as simple as dropping it and running the new schema. We will run through the altering method here.
Altering the users table
Load up your favorite database manager or the psql shell and execute the following SQL:
ALTER TABLE users
    ADD reset_password_token VARCHAR(128) UNIQUE,
    ADD reset_password_expires BIGINT,
    ADD reset_password_token_used BOOLEAN;
If it worked, you'll see something like this:
ALTER TABLE

Query returned successfully in 96 msec.
and your users table structure should look something like this:

Step 2 - Creating the Forgot Password Route
Now that you have your database altered, let's get to creating your routes, starting with the forgot password route.
More validation
In the validation directory created eariler in the series, create a new file called checkEmail.js and add the following too it:
// simple-api/validation/checkEmail.js

const Validator = require("validator");
const ifEmpty = require("./checkForEmpty");

module.exports = function validateResetInput(data) {
  let errors = {};

  data.email = !ifEmpty(data.email) ? data.email : "";

  if (Validator.isEmpty(data.email)) {
    errors.email = "Email is required";
  }
  if (!Validator.isEmail(data.email)) {
    errors.email = " Email is invalid";
  }
  return {
    errors,
    isValid: ifEmpty(errors),
  };
};
We will use this file in our fogot password route to check if the user is using a valid email address.
The Forgot Password Route
At the top of api/routes/users.js, import your new email validator:
// simple-api/api/routes/users.js

// Forgot password validation
const validateResetInput = require("../../validation/checkEmail");
Now add your forgot password route to users.js.
router.post("/forgot", function(req, res) {
  const {errors, isValid } = validateResetInput(req.body);

  if (!isValid) {
    return res.status(400).json(errors);
  }
  let resetToken;
  crypto.randomBytes(48, (err, buf) => {
    if (err) throw err;
    resetToken = buf.toString("hex");
    return resetToken;
  });
Notice this route starts off like our '/register' and '/resend_email' routes where we validate the users input and if it's good, we pseudo-randomly generate a token with crypto.randomBytes. In production you might want to use something more secure like an RSA key pair.
Now let's you'll use KnexJS again to make a database call to the users table and check if the email sent by the user exists:
  database
    .table("users")
    .select("*")
    .where("email", req.body.email)
    .then(emailData => {
      if (emailData.length == 0) {
        res.status(400).json("Invalid email address");
      } else {
If the email doesn't exist in the database, return a 400 error with "Invalid email address" as our JSON response.
If it does exist, make another call to the users table and update those 3 new columns we setup in the last step with a reset token and the current date:
database.table("users").where("email", emailData[0].email).update({
  reset_password_token: resetToken,
  reset_password_expires: Date.now(),
  reset_password_token_used: false,
});
Finish the route off with a '.then' to send an email to the user with the token and add catch any errors that might come up:
          .then(done => {
            let to = [req.body.email];

            let link = "https://yourWebsite/v1/users/verify/" + resetToken;

            let sub = "Reset Password";

            let content =
              "<body><p>Please reset your password.</p> <a href=" +
              link +
              ">Reset Password</a></body>";
            //Passing the details of the email to a function allows us to generalize the email sending function
            sendEmail.Email(to, sub, content);

            res.status(200).json("Please check your email for the reset password link");
          })
          .catch(err => {
            res.status(400).json("Bad Request");
          });
      }
    })
    .catch(err => {
      res.status(400).json("Bad Request");
    });
});
Notice how our error messages simply say 'Bad request'. We do this deliberately so as to not give nefarious characters too much detail about whether they are using a correct email address to request a password reset.
Checkout part 4 of this series to see how to send emails using Amazon's Simple Email Service.
Step 3 - Creating the Reset Password Route
So now that your user has a reset token in their email, what do they do with it? Well they need to send it back, confirming that they are the owner of that email address. Next you'll add a route to do this with a little more validation.
Some More Validation
We are going to have our user enter a new password (Because they forgot their old one right?). So create a new file called newPassword.js in your validation folder to check that their new password is a good one:
// simple-api/validation/newPassword.js

const Validator = require("validator");
const ifEmpty = require("./checkForEmpty");

module.exports = function validateResetInput(data) {
  let errors = {};

  data.password1 = !ifEmpty(data.password1) ? data.password1 : "";
  data.password2 = !ifEmpty(data.password2) ? data.password2 : "";

  if (Validator.isEmpty(data.password1)) {
    errors.password1 = "Password is required";
  }
  if (!Validator.isLength(data.password1, { min: 8, max: 120 })) {
    errors.password1 = "Passwords must be at least 8 characters";
  }
  if (Validator.isEmpty(data.password2)) {
    errors.password2 = "Confirm password is required";
  }
  if (!Validator.equals(data.password1, data.password2)) {
    errors.password2 = "Passwords must match";
  }
  return {
    errors,
    isValid: ifEmpty(errors),
  };
};
The Reset Password Route
Back in api/routes/users.js, import your new password validator:
// simple-api/api/routes/users.js

// Validate new passwords
const validatePasswordChange = require("../../validation/newPassword");
and create another route:
router.post("/reset_password/:token", function (req, res) {
  const { token } = req.params;
  database
    .select(["id", "email"])
    .from("users")
    .where({ reset_password_token: token, reset_password_token_used: false })
    .then((data) => {
      if (data.length > 0) {
        const { errors, isValid } = validatePasswordChange(req.body);

        if (!isValid) {
          return res.status(400).json(errors);
        }

        bcrypt.genSalt(12, (err, salt) => {
          if (err) throw err;
          bcrypt.hash(req.body.password, salt, (err, hash) => {
            if (err) throw err;
            database("users")
              .returning("email")
              .where({ id: data[0].id, email: data[0].email })
              .update({ password: hash, reset_password_token_used: true })
              .then((user) => {
                const subject = "Password change for your account.";
                const txt = `The password for your account registered under ${user[0]} has been successfully changed.`;

                sendEmail.Email(to, subject, txt);
                res.json("Password successfully changed for " + user[0] + "!");
              })
              .catch((err) => {
                res.status(400).json(errors);
              });
          });
        });
      } else {
        res.status(400).json("Password reset error!");
      }
    })
    .catch((err) => res.status(400).json("Bad request"));
});
By now this route should look quite familiar as it is a mixture of some of our other routes. What is going on here: 1. The route takes a token as a parameter 2. Check that the token exists and has not been used before 3. If token is good, validate the new password 4. If password is valid, update the password for the user associated with the token 5. Send an email to the user telling them about their password change
Step 4 - Automatic Token Expiry
Let's add a little extra security to our API and make sure our reset tokens are automatically removed from our database after a set period of time. Add the following function to the tokenExpiry.js file we created in a previous part of this series:
// simple-api/utilities/tokenExpiry.js

setInterval(async function checkPasswordTokenValidity() {
  await database
    .select("id", "reset_password_expires")
    .from("users")
    .then((tokenExpiry) => {
      if (tokenExpiry) {
        tokenExpiry.map((resetTime) => {
          let timeInInt = parseInt(resetTime.reset_password_expires);
          if (Date.now() > timeInInt + 60000 * 60) {
            database
              .table("users")
              .where("id", resetTime.id)
              .update({ reset_password_token: null })
              .then((res) => res)
              .catch((err) => err);
          }
        });
      }
    })
    .catch((err) => console.log(err));
}, 6000);
Since you already have tokenExpiry.js set to run from your server.js file, this little function will run every 60 seconds and remove tokens older than one hour automatically. You can of course change the expiry time and how often the function will run as you see fit.
Step 5 - Test it out with postman
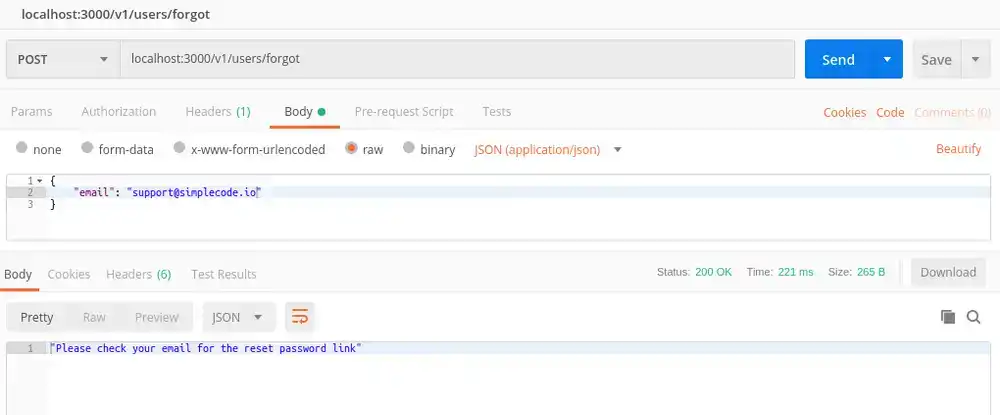
Now let's make sure it all works. First make a post request to your new /forgot route using an email that is already registered. You should see something like this:
Now using the token that was emailed to you (or you can grab it right from your users table in your database) make a post request to /reset_password/:token
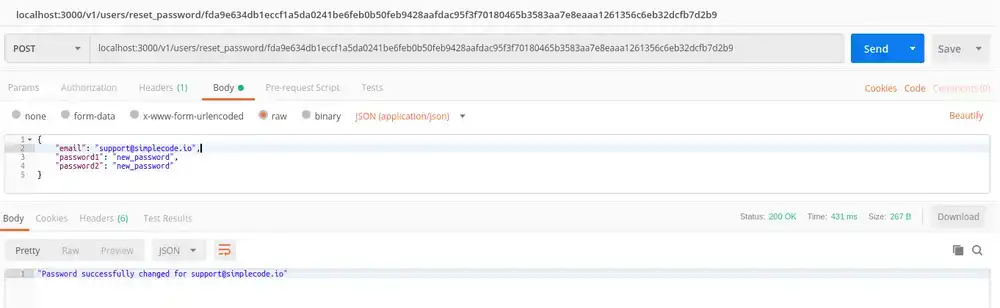
If you try to enter your user's old password in postman, you should see a "bad request" message because that isn't their password anymore. Enter the new password and you should see:
Conclusion
That's it for this part of the series!
Let us know on social media what you would like to see next!
Tools
Crypto Alerts
© Cloud Giant 2024. All rights reserved